C++/C# programmer
Developed in April 2020
For the third block of my first year in university, I had to write a game from scratch, using OpenGL for graphics, that runs on a raspberry pi.
The game needed to have two gameplay styles, one where you fly a spaceship through a solar system, and one where you walk around in a space station with a first-person camera.
There also needed to be something procedurally generated in the game and the space station needed to have real-time physics.
Besides these hard requirements, I also chose scripting as an additional requirement and structured most of my codebase around Lua integration.
I also decided to support a Windows build as well, which wasn't required.
This project was my first time using OpenGL for 3D graphics, my first time using scripting for a project, and my first time trying out procedural generation.
I also learned a lot about optimization from targeting a low-spec system like the raspberry pi.

Both platforms had their own project with shared files
We weren't allowed to use tools like CMake for this project. Instead, we had to build remotely using Visual Studio's built-in tools.
Because (at least at the time) it wasn't possible to create a single project that could target both platforms, I decided to make a main Linux project and an extra Windows project.
Files would be added to the Linux project and then shared with the Windows project.
This was a bit finicky, but it worked well enough for me at the time.
The way to differentiate between platforms within the code was by using the preprocessor. The Windows project had WINDOWS_BUILD defined, while the Linux project had RASPBERRY_BUILD defined
![Example of different code for Windows and the raspberry pi[br][br]The raspberry pi did better with medium precision floats and vertex shading, while other machines were strong enough for higher precision floats and pixel shading](/content/images/posts/SpaceGamePreprocessor.png)
Example of different code for Windows and the raspberry pi
The raspberry pi did better with medium precision floats and vertex shading, while other machines were strong enough for higher precision floats and pixel shading
Two different camera behaviors had to be implemented for this game, but that difference only exists within the gameplay scripts.
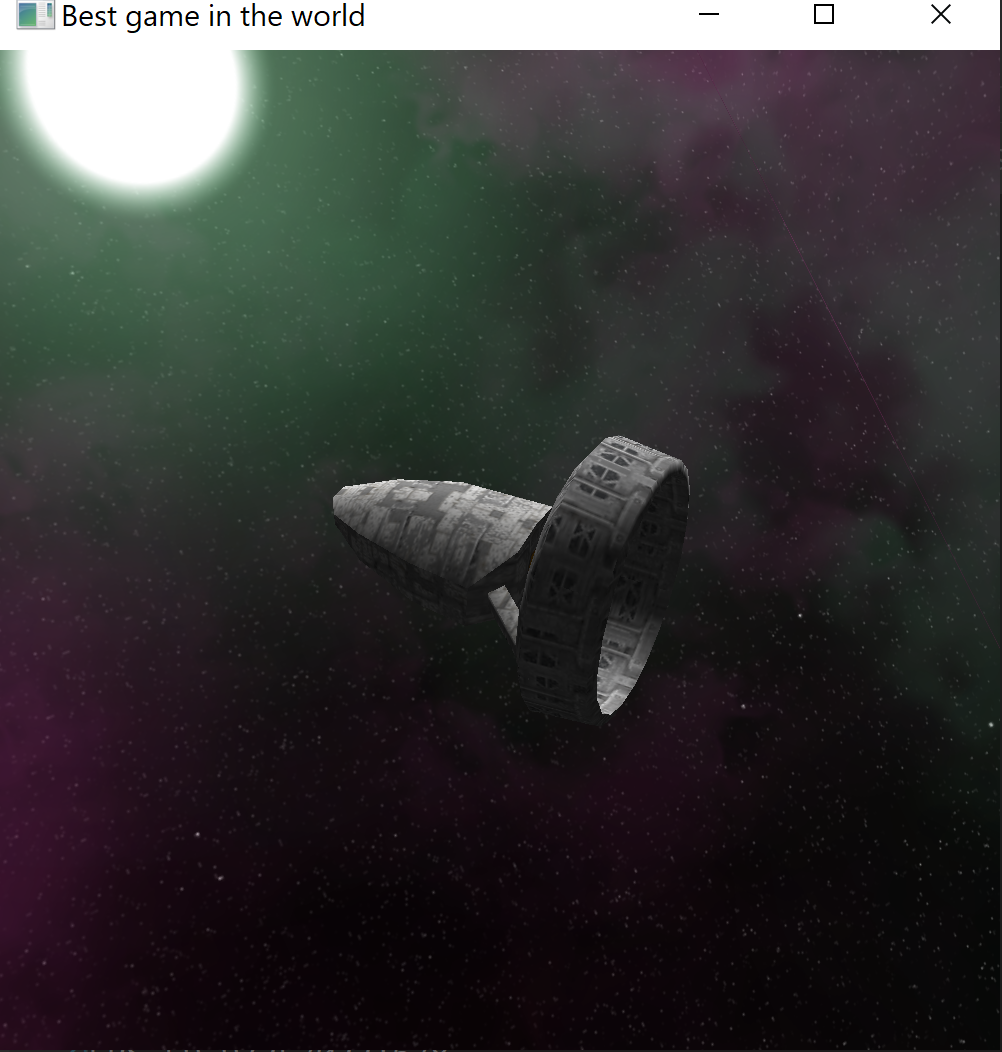
Third-person spaceship camera in action
The ship will orient itself towards the direction of the camera unless the shift key is held (so you can still look around)
First-person camera within the space station
The pitch is clamped between -85 and 85 degrees so you can't "roll over" while looking up and down
Both camera types use the same class but are simply controlled differently by gameplay code. The camera class has controls for the FOV, aspect ratio, near plane, far plane, and position. In its implementation, it uses glm functions for creating view and projection matrices that can be sent to the shaders.
Models are loaded from .obj files and the tinyobjloader library is used for loading them. There is support for models with multiple meshes and textures. An index buffer is generated for every model as well so that duplicate data isn't necessary in the vertex buffers.
.obj model files referenced in a scene file
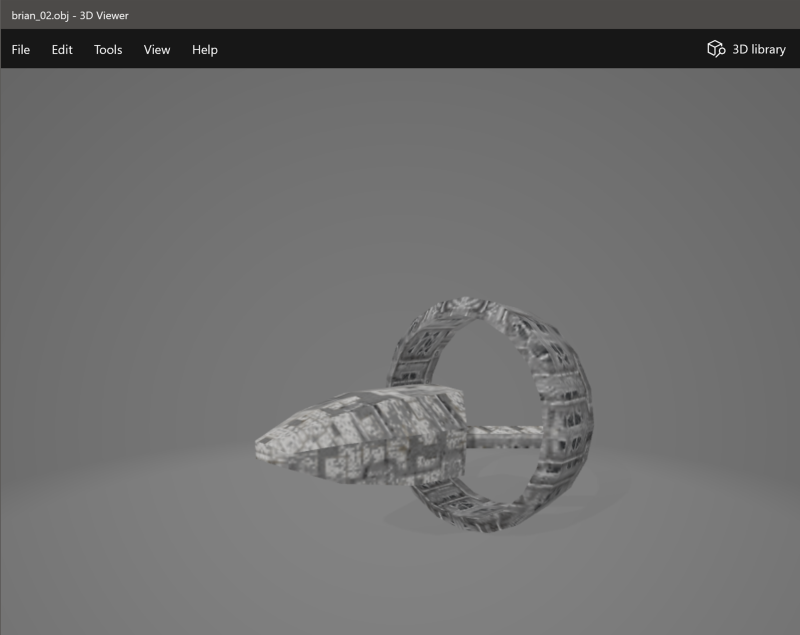
The model shown in Windows 3D viewer
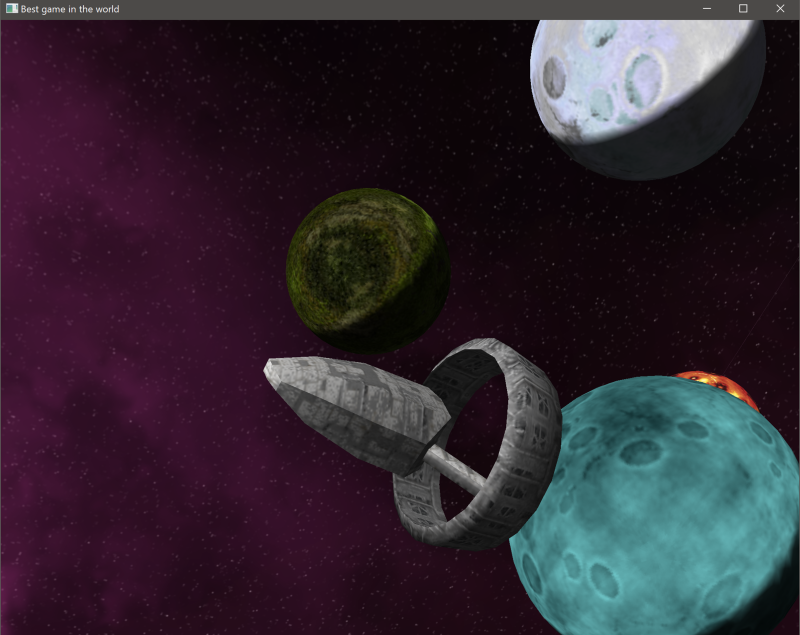
The model in-game after being loaded
The spaceship being lit from the sun in the skybox
The lighting in this project is very simple, it is just Blinn-Phong with only a directional light.
As mentioned before, the raspberry pi build uses vertex-based lighting while the Windows build will use pixel-based lighting.
This simply means that the raspberry pi will save on performance by calculating lighting in the vertex shader and interpolating between that one the model, while the Windows build will calculate the lighting for every pixel separately.
The skybox is implemented as a cube map texture on a 1x1x1 cube with inverted normals.
A "less than or equal" depth function is used to draw the skybox on any pixels that haven't already been filled in after rendering the scene.
This is more performant than drawing the skybox first and the scene over it, because there is no need to redraw irrelevant pixels.
The skybox has a variable of where the center of the sun on the texture is, which is used to calculate the global direction of sunlight.
I didn't end up having time to support multiple light sources or point lights for this project, but I did do this in my university intake project and I even wrote a full deferred renderer with light sources as drawn primitives with the low-level graphics API of the Nintendo Switch for this newer university project.
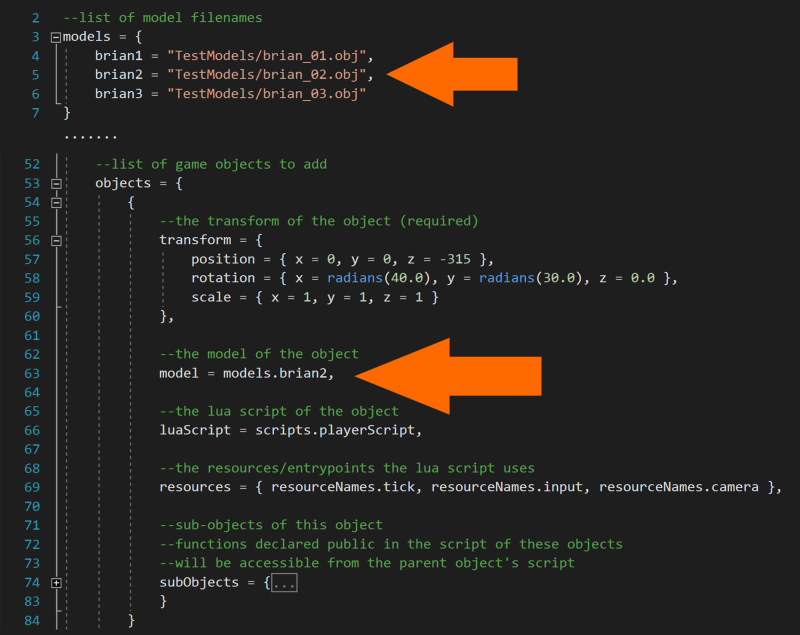
Scene file for the spaceflight scene
This shows how the player, planets, skybox, and procedurally generated meteor were added to that scene, and how filenames could be put into variables to reuse them easily
Scene files in this project were also scripted Lua files.
This allowed for things like variables to avoid duplicated strings or other values and functions/randomness in scene creation.
Objects required a transform and could get models, scripts, rigid bodies, and subobjects optionally as well.
Part of the space station scene file
This shows how functions and randomness can be used in these files to add some random boxes for the player to mess around with
All game object behavior is also created through Lua scripts.
These scripts can be given access to tick, input, camera, physics, game, and scene functionality.
Which objects get access to what is defined in the scene files.
The below example of the grenade object shows how it uses the tick function to wait three seconds to then spawn an explosion object (using the scene functions), and then destroy itself (also using scene functions).
The Lua script for the grenade object
It shows how it increments its timer on tick and spawns an explosion object and destroys itself when it's time to explode
The grenade being used in-game
Subobjects are also always available within the script of the parent object as a direct variable. I also added a "public" keyword to functions of subobjects to make them callable for the parent script, creating something like a decorator pattern, but I unexpectedly lost time due to certain circumstances while working on this project so I wasn't able to create gameplay that made use of the potential of this system.
Third-person spaceship gameplay
The ship will orient itself towards the direction of the camera unless the shift key is held (so you can still look around)
The third-person space flight scene doesn't have any gameplay besides flying around.
It was planned to add something like a minigame to enter the space station, but due to unforeseen circumstances I lost about two weeks of time on this project, so I wasn't able to finish that part.
Instead, you just switch between space flight and space station by pressing the enter key.
The biggest challenge here was the camera, which uses all kinds of interpolation to make it feel more dynamic. This is described in the cameras section.
The first-person space station scene uses the Bullet physics library for the player, terrain, and some boxes.
The camera is explained in the cameras section.
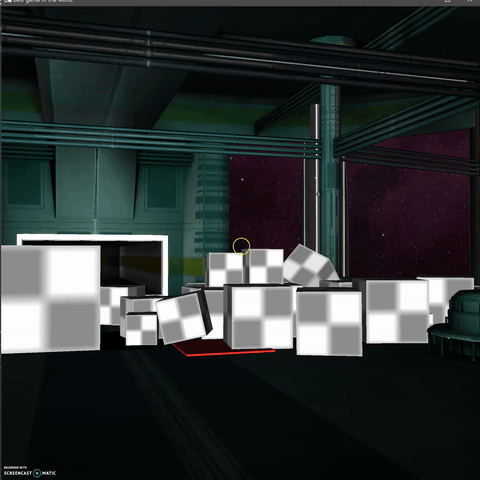
Besides that there are a few simple gameplay elements that I made to showcase the potential of the scripting system:

A bouncy pad that applies a force to the player to push them up
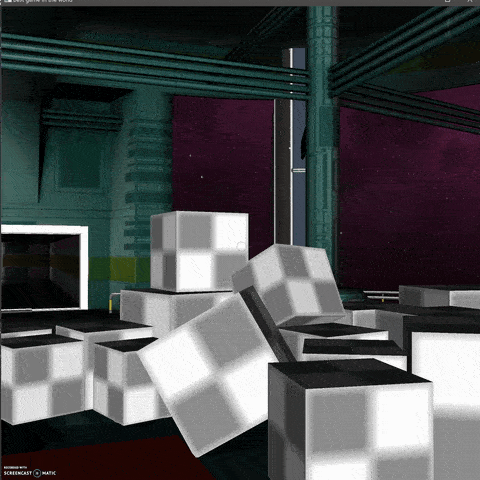
Bullets can be shot to push boxes and eventually break them after dealing enough damage
Grenades can be thrown that will explode after 3 seconds and also damage boxes as bullets do
I had to integrate the Bullet physics library into my code and I used it in my space station scene.
Adding the Bullet physics library to the raspberry pi build was very simple since any library added to that build was simply installed onto the pi through the command line and then referred to in the project files.
To include it in the Windows build as well, it had to be built manually with CMake.
Since I couldn't use CMake for my own project, I had to generate project files for Bullet.
Rather than include those projects in my Visual Studio solution, I decided to simply build them and include the .lib and include files.
This was my first experience using CMake. I later moved on to use it in several projects.
To integrate the physics library with the rest of the codebase, I had to synchronize the transforms from Bullet with the transforms of my objects. I had decided earlier to use glm as my math library, so all game objects had a transformation matrix from glm. Since these transforms can be changed by things other than physics as well (especially gameplay scripts), I needed to update the matrices in the physics simulation to reflect those changes. And since the transformations obviously change within the physics simulation as well, I would also need to reflect these changes for the rest of the code. The result was the pseudocode you can see below:
Pseudocode for how the physics library is updated and synchronized with the rest of the code
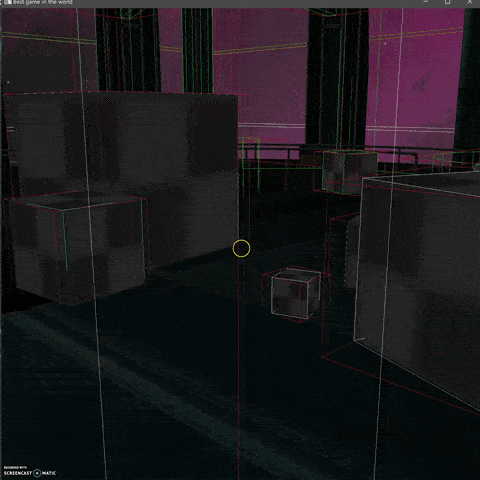
Physics debug rendering in action
It is very easy to add debug drawing to Bullet physics.
All I had to do was implement a child of the btIDebugDraw class and implement the drawLine, reportErrorWarning, and get/set DebugMode functions.
Then I had to supply the library with an instance of this class and it would use it whenever I enabled debug mode (which I set to toggle on the tab key).
I simply made the drawLine function use a simple shader and a dynamic vertex buffer that gets updated every time a line is drawn.
It could have been much more efficient, but there wasn't any need for that since it's just a debug tool and it didn't affect performance that much anyway.
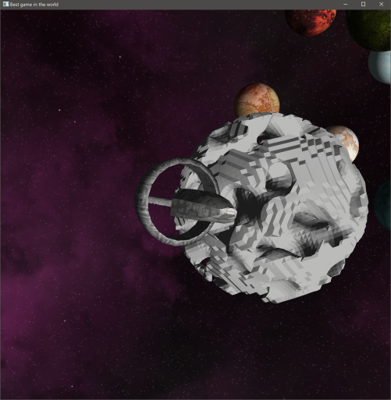
Something procedurally generated had to be included in the project. I wanted to generate a hollow cave-like planet interior that you could walk on with "magnet boots" so you would stick on the walls and ceiling, but because I lost about two weeks of time due to unforeseen circumstances, I had to down scope that into the space station scene. I kept the generation and scaled down the result so it would be a strange-looking meteor. Sadly, the generated shape wasn't meant to be viewed from the outside, so when I implemented it I didn't care what it looked like from there.
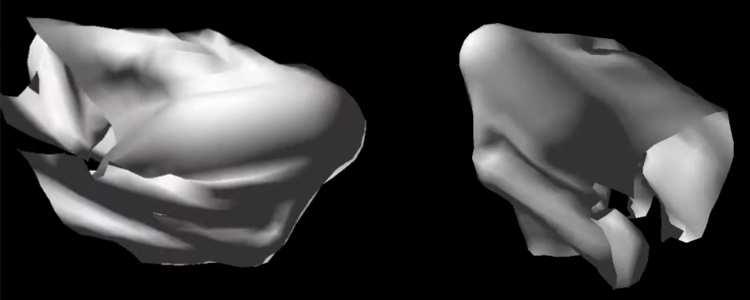
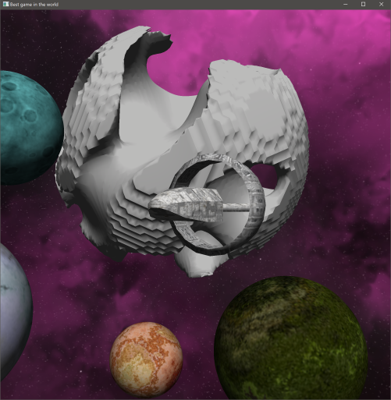
![The generated meteor shape[br]The right version is clamped to be a sphere with noise in it, while the left version is the same noise without said clamping](/content/images/posts/SpaceGameProcedural.gif)
The generated meteor shape
The right version is clamped to be a sphere with noise in it, while the left version is the same noise without said clamping
The generation was simple, it used Perlin noise and marching cubes to generate a mesh. This first created some very jagged shapes, since the normals aren't automatically smoothed when using marching cubes. To rectify this, I had to make a graph of vertices and triangles while generating the shape with marching cubes. After generation, I could generate vertex normals by averaging out the normals of all triangles they're a part of, which smoothed the normals. This approach also required would-be duplicate vertices to appear only once, since they are now involved in several triangles. This made it very simple to apply an index buffer and save on a lot of data as well.
The shape before smooth normals
The shape after smooth normals
The script for the Perlin sphere
The noise being clamped into a sphere was done through scripting.
The script received information about the marching cubes and had to output the value of a specific corner.
To clamp the shape into a sphere, all values outside of that sphere are set to zero, meaning they aren't included in the shape.
It also calculates a fade value using a wall thickness to make the shape fade into its outer walls, because there would still be some gaps otherwise.
Project tags: #3D Math, #C++, #Cross-Platform, #Custom-Engine, #Graphics, #Lua, #OpenGL, #Physics, #Procedural, #Scripting