C++/C# programmer
Developed in April 2021
For the third project of my second year in university, I decided to implement a renderer for my team's project that uses the native graphics API of the Nintendo Switch.
This was quite a challenge because, besides going through the Vulkan tutorial a few times before starting university, I didn't have any experience with low-level graphics APIs.
But my lack of experience wasn't the only challenge, I also chose an API that is under NDA, meaning it won't have any documentation or tutorials made by anyone but Nintendo themselves.
I ended up learning the API and writing a deferred renderer with it that used shape primitives to render any number of lights.
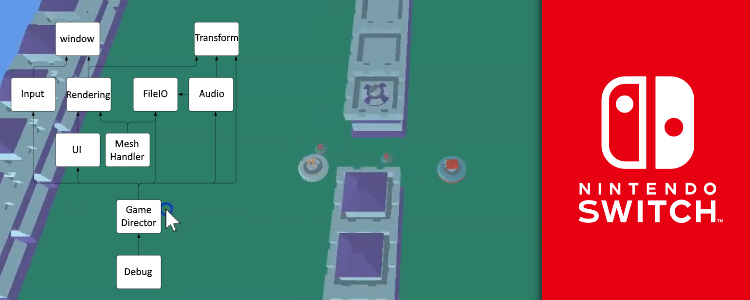
Planning of the general structure of the renderer with sub-renderers (referred to as pipelines) that are first used for testing to learn the API and will later be used to draw any single type of thing in the game
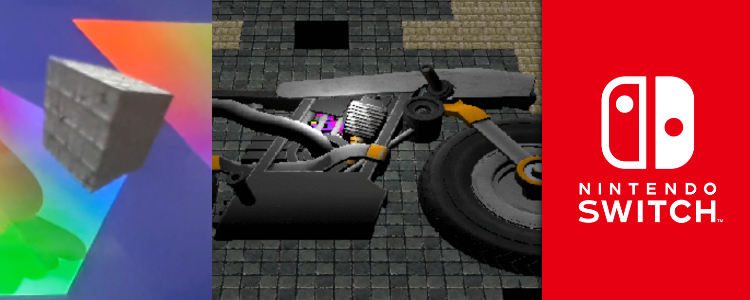
![The final product of the learning stage where you can see a textured triangle and a quad blicking with uniforms and a transforming 3D model of a cube[br][br]The quality is bad because I filmed a screen for this](/content/images/posts/SwitchGraphicsTransformingModel.gif)
The final product of the learning stage where you can see a textured triangle and a quad blicking with uniforms and a transforming 3D model of a cube
The quality is bad because I filmed a screen for this
To learn the API, I had to take it step-by-step.
I wanted to start with rendering a triangle, then start adding textures, make it a quad with an index buffer, and then render a loaded 3D model with shading that transforms over time.
To do this, I wanted to think of some structure where I could integrate these separate concepts as small renderers and mix and match them.
That way I could already have all my graphics resources integrated into the project and I'd be able to look back on how I rendered a triangle when I move on to work on rendering full 3D models.
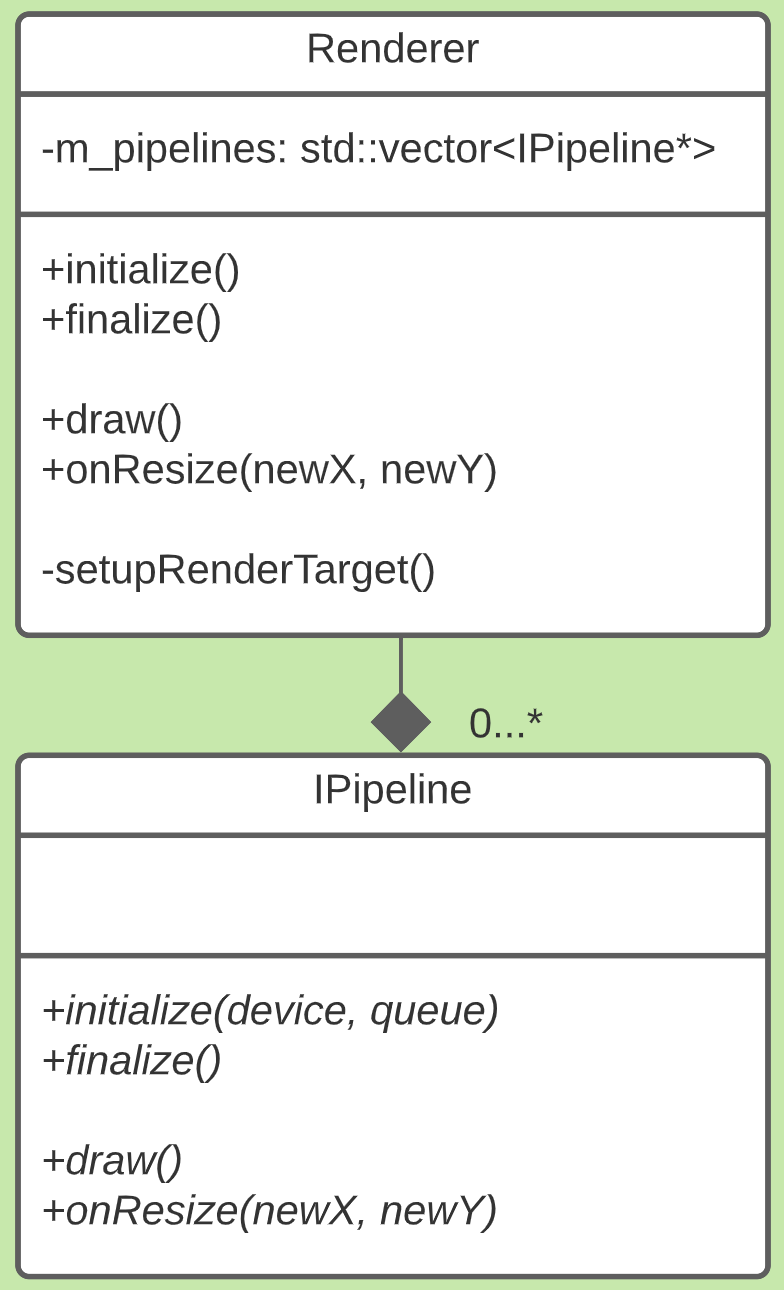
I ended up with the structure you see on the right, where a Renderer class has any number of Pipelines.
The Renderer keeps track of general resources like the window and the swapchain, while the Pipelines are tasked with putting something on the screen.
This way I could have a pipeline for rendering a single triangle, one for rendering a textured quad, one for a transforming 3D model, and eventually, one to render the models and lighting of the game.
Before I could start implementing pipelines, I had to write the parent Renderer class that implemented clearing the screen. To fully test that this worked, I made it change the clear color over time using sine functions so that I could see that the frames were being swapped. This taught me how to set up a swapchain, and how to work with command buffers and synchronization.
A single triangle is the first thing you'll render when learning any graphics API. This wasn't very difficult to do, but it taught me how to work with vertex buffers, index buffers, and shader programs.
Since I had already used index buffers for the triangle, turning it into a quad was no trouble at all. I did, however, learn how to load and prepare textures and how to work with samplers. I also made the quad multiply its color with a uniform vector that changed over time to learn about uniforms. All of this made me interact with GPU memory in new ways.
Since I had already learned about most of the basic features of any graphics API, it was now time to apply it all into a transforming 3D model. The vertex buffer for this model had all attributes in different parts of the buffer rather than interlacing them, which taught me that I have full control over how I lay out my memory even on the GPU.
![The first screenshot of the renderer when it was first integrated[br][br]It was fully capable of rendering 3D models, but the game only had textures on planes at the time. There is also nothing wrong with the camera angle, that's how it looked on PC as well](/content/images/posts/SwitchGraphicsInitialRenderer.png)
The first screenshot of the renderer when it was first integrated
It was fully capable of rendering 3D models, but the game only had textures on planes at the time. There is also nothing wrong with the camera angle, that's how it looked on PC as well
There was one other graphics programmer on my team, who worked on rendering with OpenGL.
His work was targeting windows, but it could work on the Nintendo Switch as well.
My work was mostly educational, so it made sense that his work could still be a backup for the Switch if mine didn't work out for some reason.
It wasn't very difficult to separate my renderer from the other one, we just used preprocessor definitions and a typedef to switch between renderer classes.
This made it possible for us to work in entirely separate files.
There was already a model loader implemented by the other graphics programmer for the OpenGL renderer.
All I had to do was add some code in the middle that would pass it to a platform-dependent function or class in a consistent format.
This took some work because it was slightly hardcoded, but it wasn't too difficult.
After that was done I just had to get that data into buffers and then use those buffers while rendering.
![The deferred renderer at the end of the block. It shows the game just as it was on the PC version. The models that make up the terrain have some specularity to them. Sadly, we never had time to make use of the capability of using any number of light sources[br][br]The quality is bad because I recorded a screen for this](/content/images/posts/SwitchGraphicsFinal.gif)
The deferred renderer at the end of the block. It shows the game just as it was on the PC version. The models that make up the terrain have some specularity to them. Sadly, we never had time to make use of the capability of using any number of light sources
The quality is bad because I recorded a screen for this
One of the requirements of our game was to have many light sources.
To meet this requirement, both renderers were going to implement deferred shading.
The game rendering pipeline would first draw colors, normals, and positions to textures.
These textures would then be sampled when rendering light sources, which would use an additive blend mode to build up the final colors.
A directional light affects all pixels, so it's drawn as a full-screen quad.
A point light affects a sphere in the scene, but because spheres are quite complex geometry I decided to use a cube and discard pixels outside of the sphere.
This approach for point lights might not have been the most efficient, but there wasn't enough time in the project to measure the performance of both approaches.
Although all of this was finished and we could have had any number of light sources in our game by simply adding a point light component to entities in the ECS, the project as a whole experienced significant delay that made it so the team didn't have time to make use of this capability.
![Initial deferred shading result with a directional light a single point light[br][br]Model loading was still being implemented by a teammate at the time which is why there are still just planes](/content/images/posts/SwitchGraphicsInitialDeferred.png)
Initial deferred shading result with a directional light a single point light
Model loading was still being implemented by a teammate at the time which is why there are still just planes
![Deferred rendering with a directional light and single point light applied to a bike model[br][br]The light source moved with the player, so the screenshots were taken at different camera positions which causes the distortion between the screenshots](/content/images/posts/SwitchGraphicsDeferredBike.gif)
Deferred rendering with a directional light and single point light applied to a bike model
The light source moved with the player, so the screenshots were taken at different camera positions which causes the distortion between the screenshots
Project tags: #C++, #Cross-Platform, #Custom-Engine, #ECS, #Graphics, #Nintendo Switch